
Introduction
Streamlit is an easy to use python framework to build interactive apps. As opposed to fully featured frameworks like Django and Flask, Streamlit is very opinionated as it has fewer features, but the advantage is you can deploy Streamlit app in under 5 minutes with no knowledge of APIs or routes. Streamlit has recently gotten very popular, especially among data scientists as a quick way to present their findings.
Openscale allows you to sync your smart scale to your smartphone. It also has options to export the data, which I’ve synced with Dropbox to store in a particular folder. In this example, I’ll use the weight data export from Openscale to show historic variation of weight data interactively
This tutorial will have three sections:
- Build - Building the app from scratch.
- Package - Packaging the app such that it can be deployed by anyone on their local computer, batteries included.
- Deploy - Deploying it for free on a publicly accessible website.
Build
Basic Setup
Let’s start by creating a new folder as our root.
mkdir streamlit-openscale && cd streamlit-openscale
It’s a general practice for any sort of self-contained projects to start with by creating a virtual environment. There are very good reasons to use a virtual environment, which I’ll not go into detail here. Let’s create a venv and activate it
python3 -m venv venv && source venv/bin/activate
We’ll also need to install the libraries that we’ll be using for the project. Instead of manually installing them one by one, the standard approach is to create a requirements file which holds the information on the different libraries and their versions. Let’s create a file called requirements.txt which has the following contents.
dropbox==9.5.0
pandas==1.0.3
plotnine==0.6.0
streamlit==0.57.3
Now, we install the requirements using the following command. This should take a few minutes to install all the dependencies. These will be installed within the venv folder keeping the dependencies completely contained within that folder.
pip3 install -r requirements.txt
Note: If you’re using git for version control, it is a good idea to add venv into .gitignore to prevent all the libraries from getting checked in
Now let’s add the entrypoint into the app. This will be the main.py file which has the following content.
#!/usr/bin/env python3

from src.ui import run_streamlit_ui


if __name__ == "__main__":
    run_streamlit_ui()
The last thing to do as part of the setup is to create a /src folder and add the following empty files into it.
mkdir src && cd src
touch __init__.py && touch dropbox_aux.py && touch plot.py && touch ui.py
Your directory structure should look like this now:
├── main.py
├── requirements.txt
├── src
│   ├── __init__.py
│   ├── dropbox_aux.py
│   ├── plot.py
│   └── ui.py
└── venv
Just to make sure everything is working correctly till now, let’s edit ui.py and add the following content into it.
import streamlit as st


def run_streamlit_ui():
    st.markdown("## Openscale + Streamlit = Awesome")
Now run the following command in the terminal after moving to the root folder
cd ..
streamlit run main.py
You should see a process running with an output similar to below.
  You can now view your Streamlit app in your browser.

  Local URL: http://localhost:8501
  Network URL: http://192.168.0.36:8501
You should also see the following screen if you navigate to localhost:8501 in your browser:
Your basic streamlit app is ready!
Adding the App content
Now let’s populate each file to actually do something useful.
dropbox_aux.py
import pandas as pd
from io import StringIO


def get_latest_file_name_from_dropbox(dbx, folder_name, username):
    files_list = dbx.files_search(folder_name, query=username + "*.csv")
    return sorted([(x.metadata.name, str(x.metadata.server_modified)) for x in files_list.matches], key=lambda x: x[1])[-1][0]


def download_file_data_from_dropbox(dbx, folder_name, latest_file):

    meta, res = dbx.files_download(folder_name + "/" + latest_file)
    file_output = res.content.decode("utf-8")
    return pd.read_csv(StringIO(file_output)).query("dateTime!='0.0'")
This file contains the auxilliary functions required to get the weights data using the Dropbox API.
get_latest_file_name_from_dropbox- Gets the list of files matching a pattern from a particular folder and returns the latest one (most recently updated)download_file_data_from_dropbox- Downloads the particular file from dropbox
Here is an example snippet of data after downloading from dropbox:
             dateTime  weight
0    2020-10-05 09:43    65.1
1    2020-10-04 19:14    64.0
2    2020-10-03 09:50    64.3
3    2020-10-02 20:27    63.7
4    2020-09-30 19:05    63.7
..                ...     ...
764  2018-08-10 22:07    67.7
765  2018-08-10 08:36    65.8
766  2018-08-10 08:35    65.8
767  2018-08-10 08:26    66.2
768  2018-08-10 08:23    66.2
plot.py
from plotnine import ggplot, geom_point, geom_smooth, aes, geom_vline, geom_text, geom_label
from pandas import to_datetime


def plot_and_save(scale_data_df_cleaned, smooth_factor, temp_file_name):
    plot_output = (ggplot(scale_data_df_cleaned, aes(x='timestamp', y='weight')) +
                   ##   facet_wrap('~', ncol = 1, scales = 'free') +
                   geom_point(size=0.5) +
                   geom_smooth(span=smooth_factor, color='red'))
    plot_output.save(temp_file_name, width=13, height=10, dpi=80)
This file contains the plotting functions. Here I’m using the plotnine package which is heavily inspired from the amazing ggplot package in R.
plot_and_save- Plots the weight data and saves the plot into a temporarily file to plotted bystreamlit
ui.py
import os
from datetime import datetime, timedelta

import dropbox
import pandas as pd
import streamlit as st

from src.dropbox_aux import get_latest_file_name_from_dropbox, download_file_data_from_dropbox
from src.plot import plot_and_save


def run_streamlit_ui():
    st.markdown("## Historical Weight Chart")

    DROPBOX_KEY = os.environ['DROPBOX_OPENSCALE_ACCESS_KEY']
    FOLDER_NAME = "/openscale"
    TEMP_FILE_NAME = "image.png"

    users = ["Alex", "Malavika"]
    default_start_date = pd.to_datetime("2018-08-01")

    username = st.sidebar.selectbox("Select User", users)
    date_start = st.sidebar.date_input("Start Date", default_start_date)
    date_end = st.sidebar.date_input("End Date", datetime.today()) + timedelta(days=1)
    smooth_factor = st.sidebar.slider("Select smoothening factor", 0.01, 0.5, 0.12)

    dbx = dropbox.Dropbox(DROPBOX_KEY)

    latest_file = get_latest_file_name_from_dropbox(dbx, FOLDER_NAME, username)
    scale_data_df = download_file_data_from_dropbox(dbx, FOLDER_NAME, latest_file)

    scale_data_df_cleaned = scale_data_df \
        .loc[:, ["dateTime", "weight"]] \
        .assign(timestamp=pd.to_datetime(scale_data_df['dateTime'])) \
        .query("timestamp >= @date_start & timestamp <= @date_end")

    plot_and_save(scale_data_df_cleaned, smooth_factor, TEMP_FILE_NAME)
    st.image(TEMP_FILE_NAME)
This is the main file which wraps over all the other functions. It has a single function run_streamlit_ui.py which does the following:
- Setup the high-level variables
DROPBOX_KEY- You will need to get a Dropbox API key for to access the Dropbox APIFOLDER_NAME- This is the folder in which the exports from theopenscaleapp is situated.TEMP_FILE_NAME- This could be anything.
- Creates the inputs for the streamlit app
username- Name of the userdate_start- Start date of the plotdate_end- End date of the plotsmooth_factor- How much the loess curve should be smoothened
- Get weights data from dropbox
- create a Dropbox connection class
- get the latest file name from dropbox
- download the data
- Cleans the data with the inputs for plotting
- Saves the plot into a temporary file
- Plots the image file on Streamlit
Running everything locally
Now that we’ve the app content also ready, we can try running it locally. As mentioned before, we’re providing the DROPBOX_OPENSCALE_ACCESS_KEY as an environment variable.
DROPBOX_OPENSCALE_ACCESS_KEY=<your_key> streamlit run main.py
You should be able to the full output similar to below:
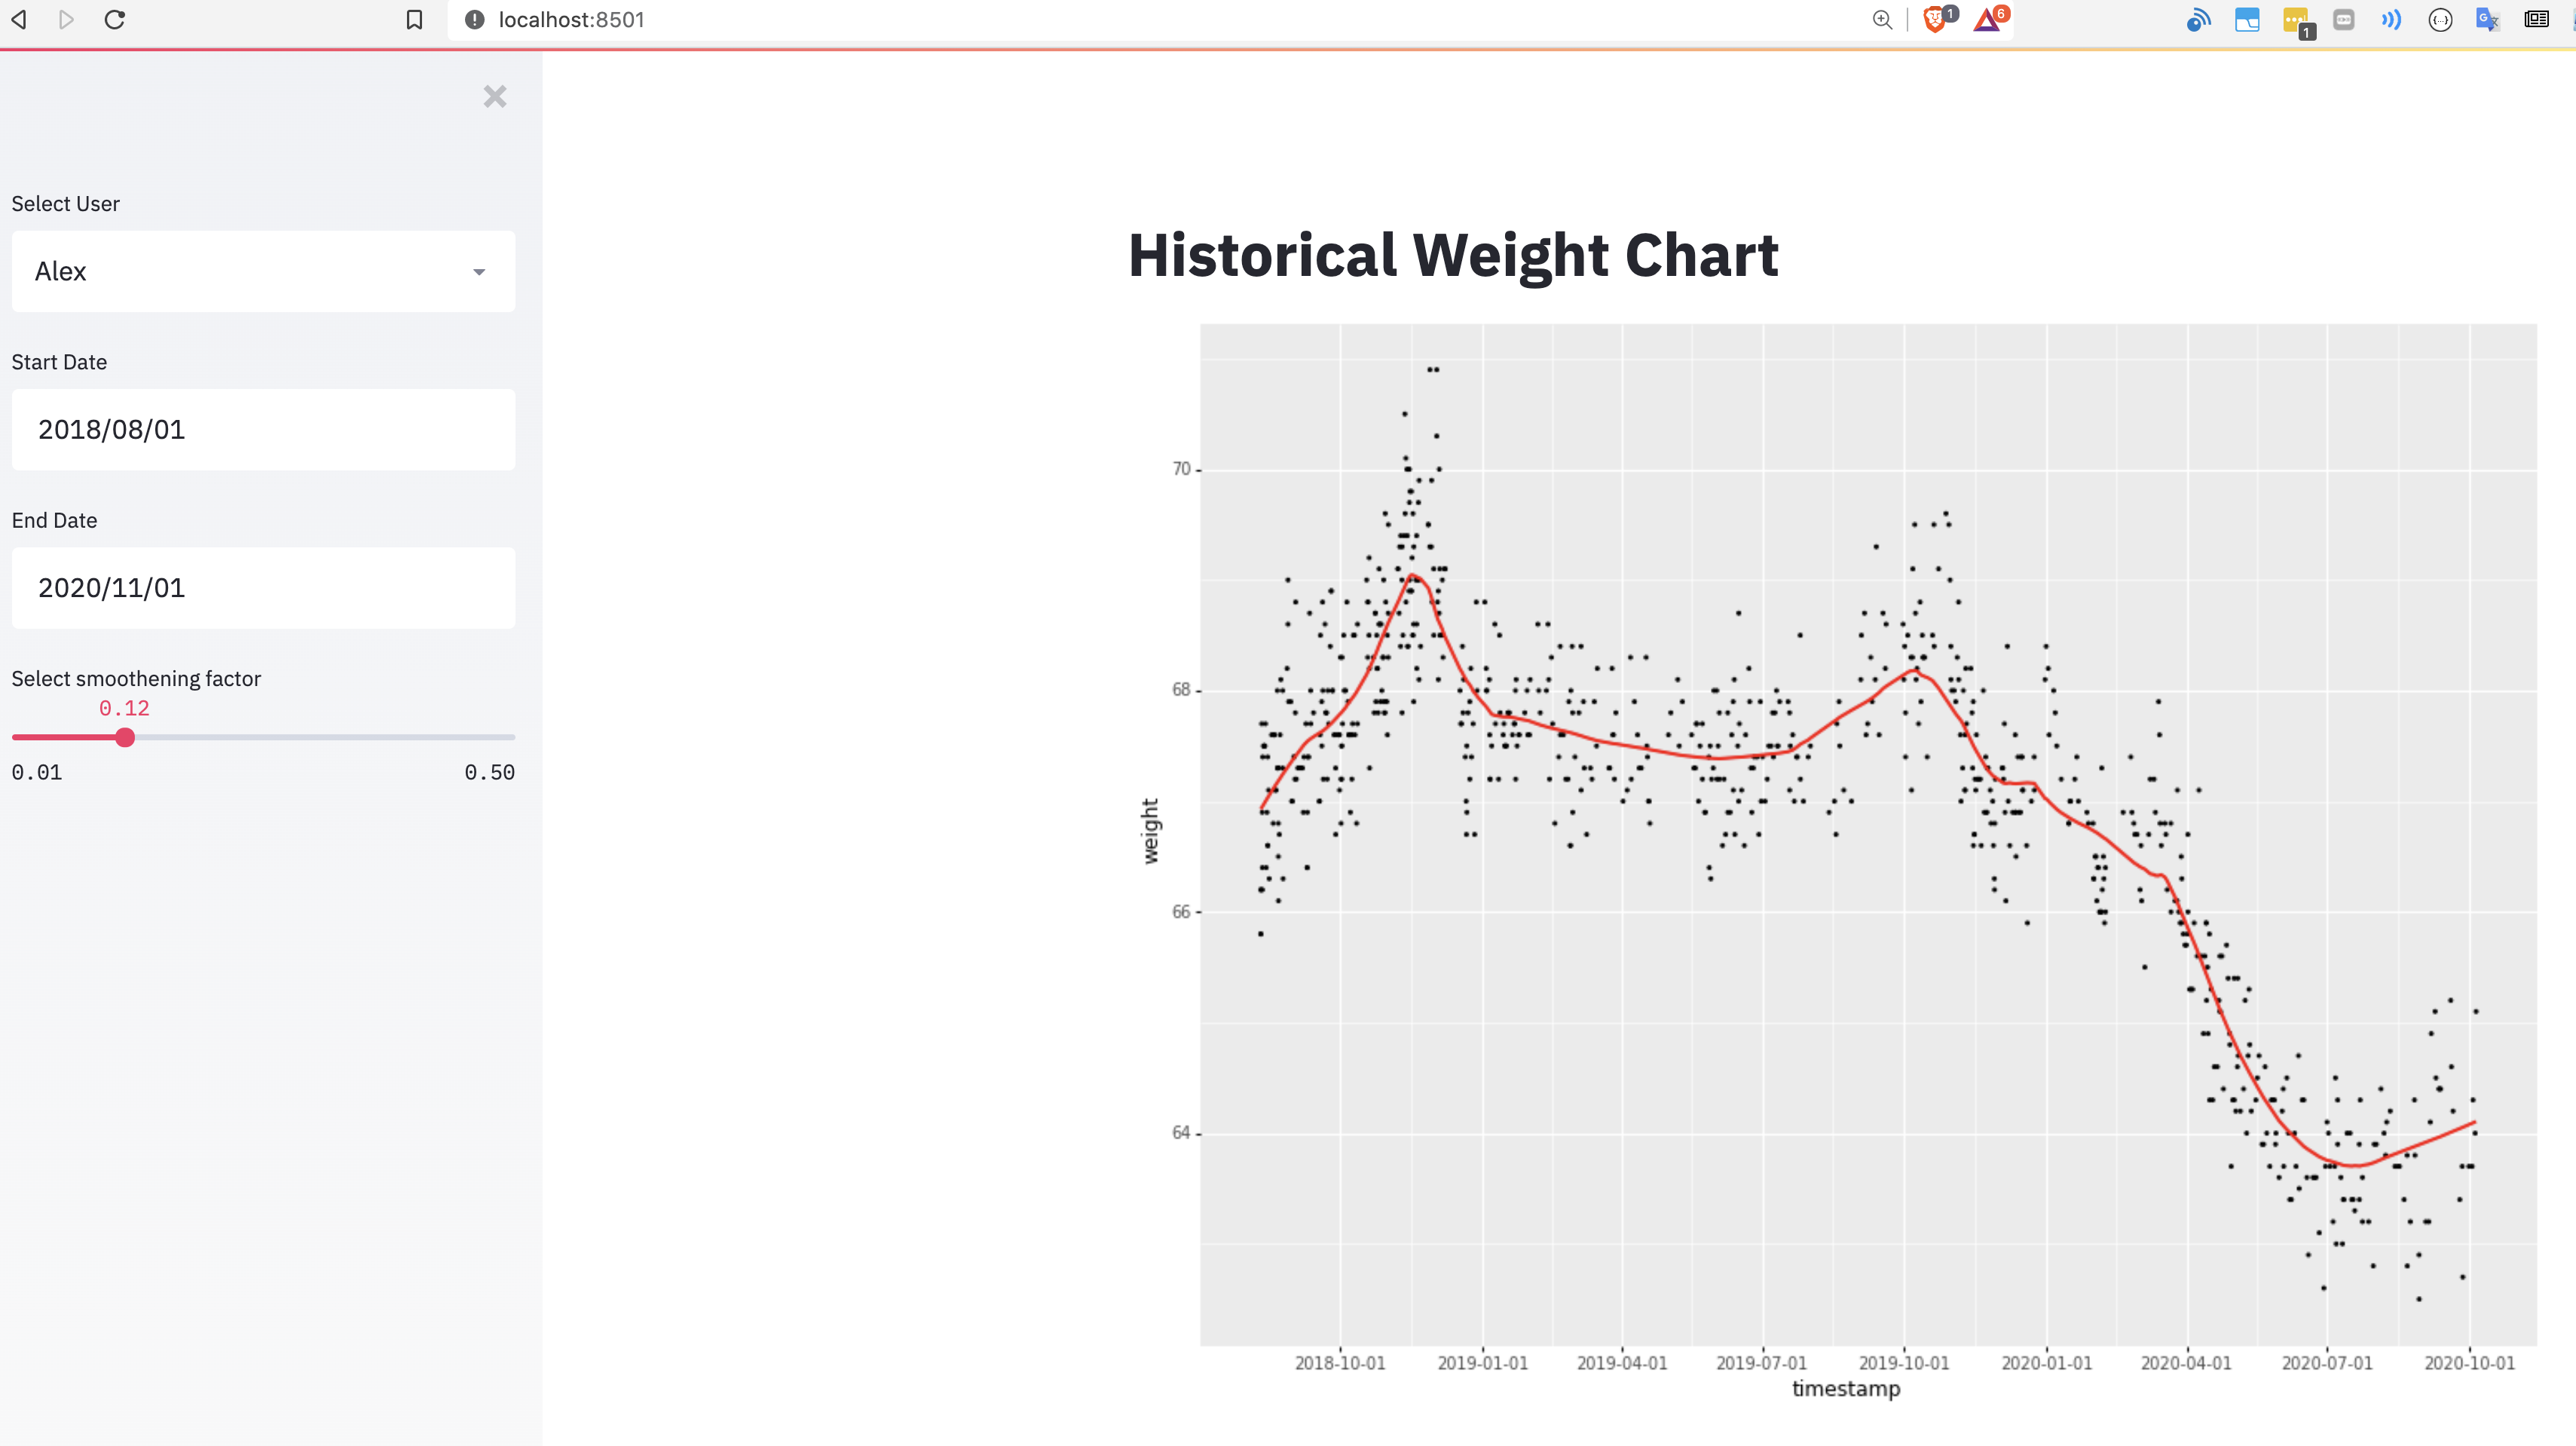
I seem to be slowly gaining the weight I lost during the lockdown!
Deploying it in Heroku
Step 1: Add app in the Heroku dashboard
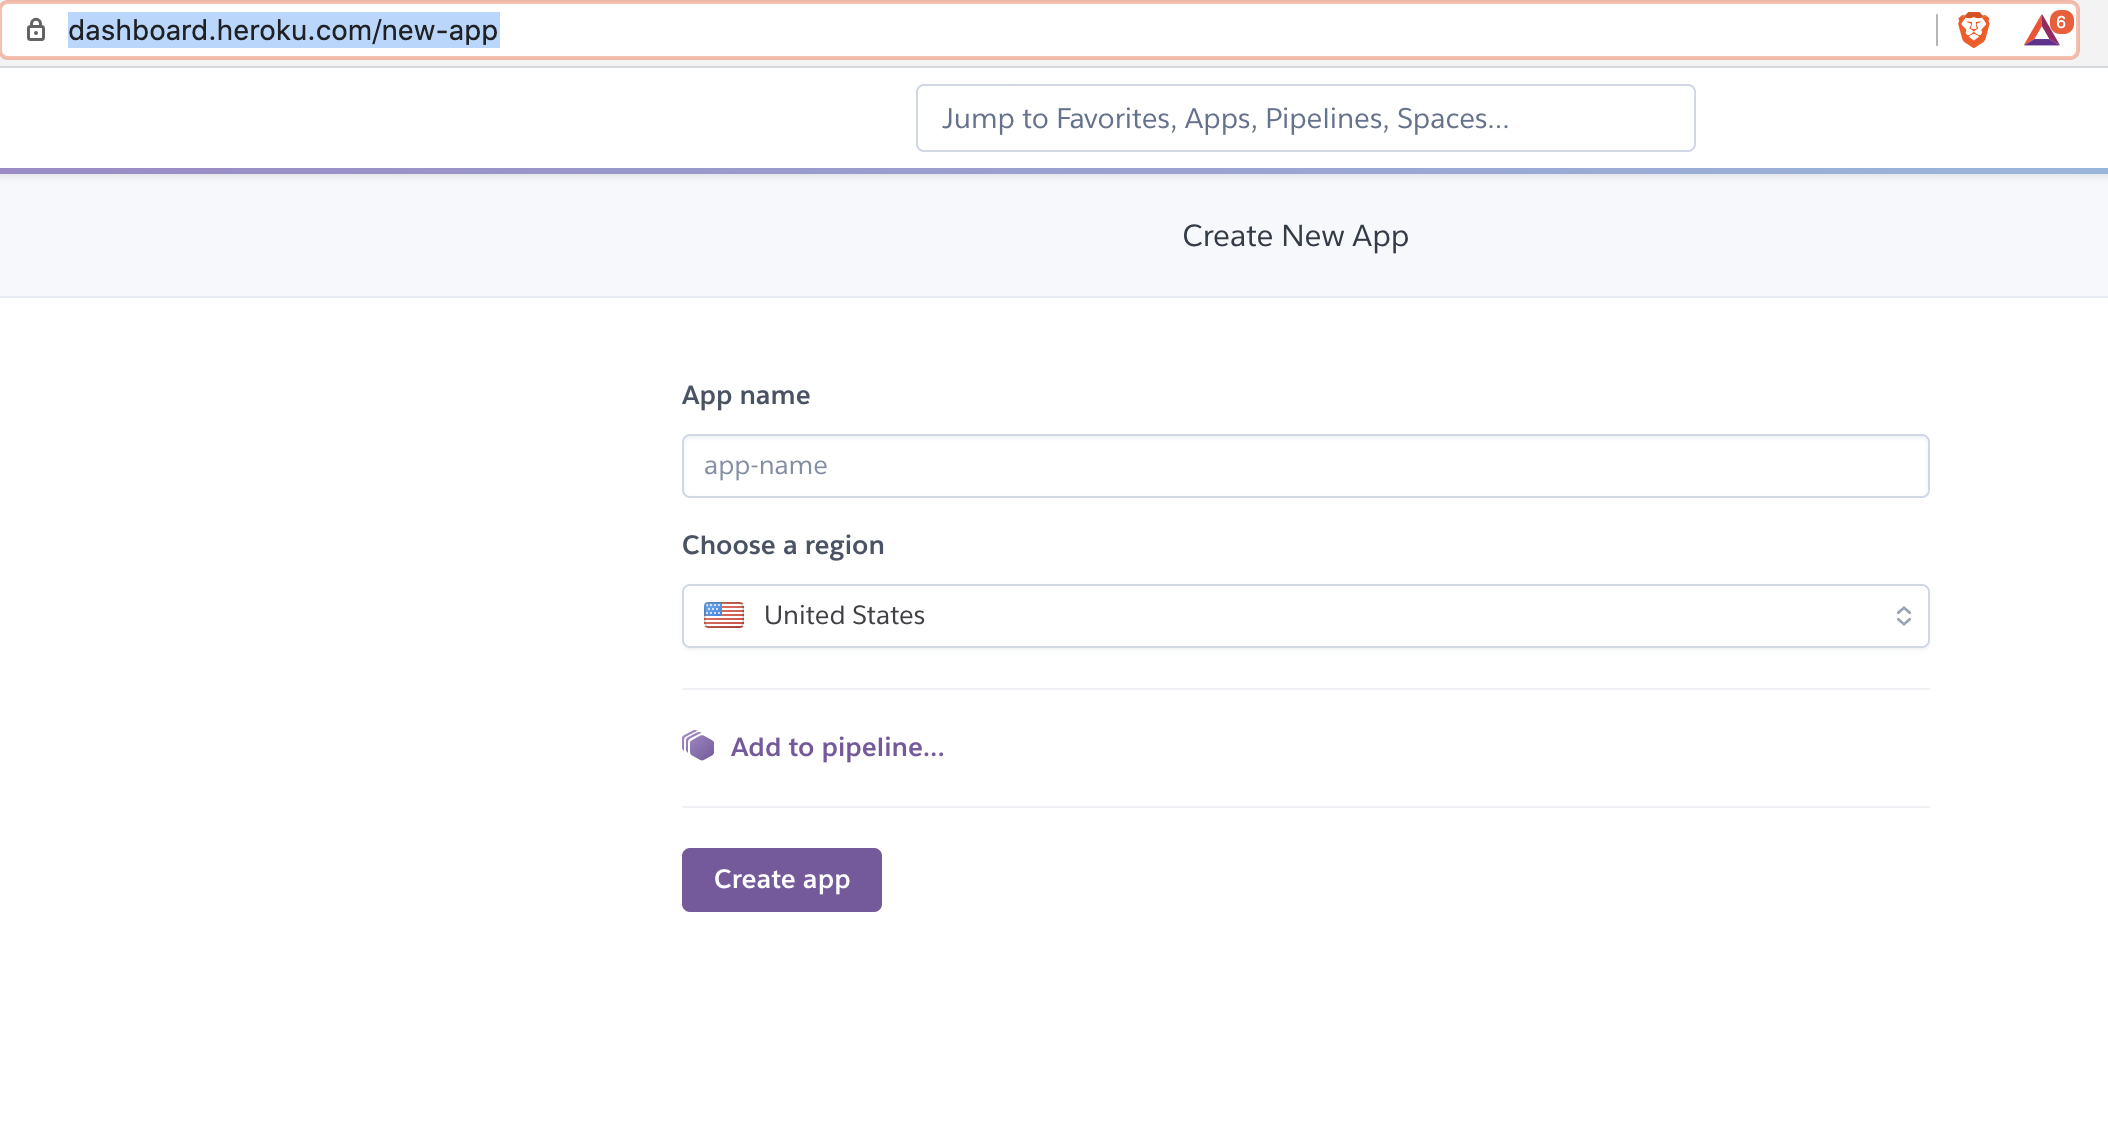
You can go to the new app screen once you’ve created a heroku account to create a new app.
Here I’m creating a new app streamlit-openscale-test.
Step 2: Login to Heroku, create a git repository and add Heroku as remote
First, download and install the Heroku CLI. Then log in to your Heroku account and follow the prompts to create a new SSH public key.
heroku login
Step 3: Create a git repository and add Heroku as remote
Run the following command in your terminal to create a git repository in your root folder and add heroku git as a remote
git init
heroku git:remote -a streamlit-openscale-test
Optionally you can add github as a remote as well for version control
Step 4: Add the Heroku configuration files
Procfile
web: sh setup.sh && streamlit run main.py
setup.sh
mkdir -p ~/.streamlit/

echo "\
[general]\n\
email = \"<your_email_id>\"\n\
" > ~/.streamlit/credentials.toml

echo "\
[server]\n\
headless = true\n\
enableCORS=false\n\
port = $PORT\n\
" > ~/.streamlit/config.toml
Your folder structure should look like this now:
├── Procfile
├── image.png
├── main.py
├── requirements.txt
├── setup.sh
├── src
│   ├── __init__.py
│   ├── dropbox_aux.py
│   ├── plot.py
│   └── ui.py
└── venv
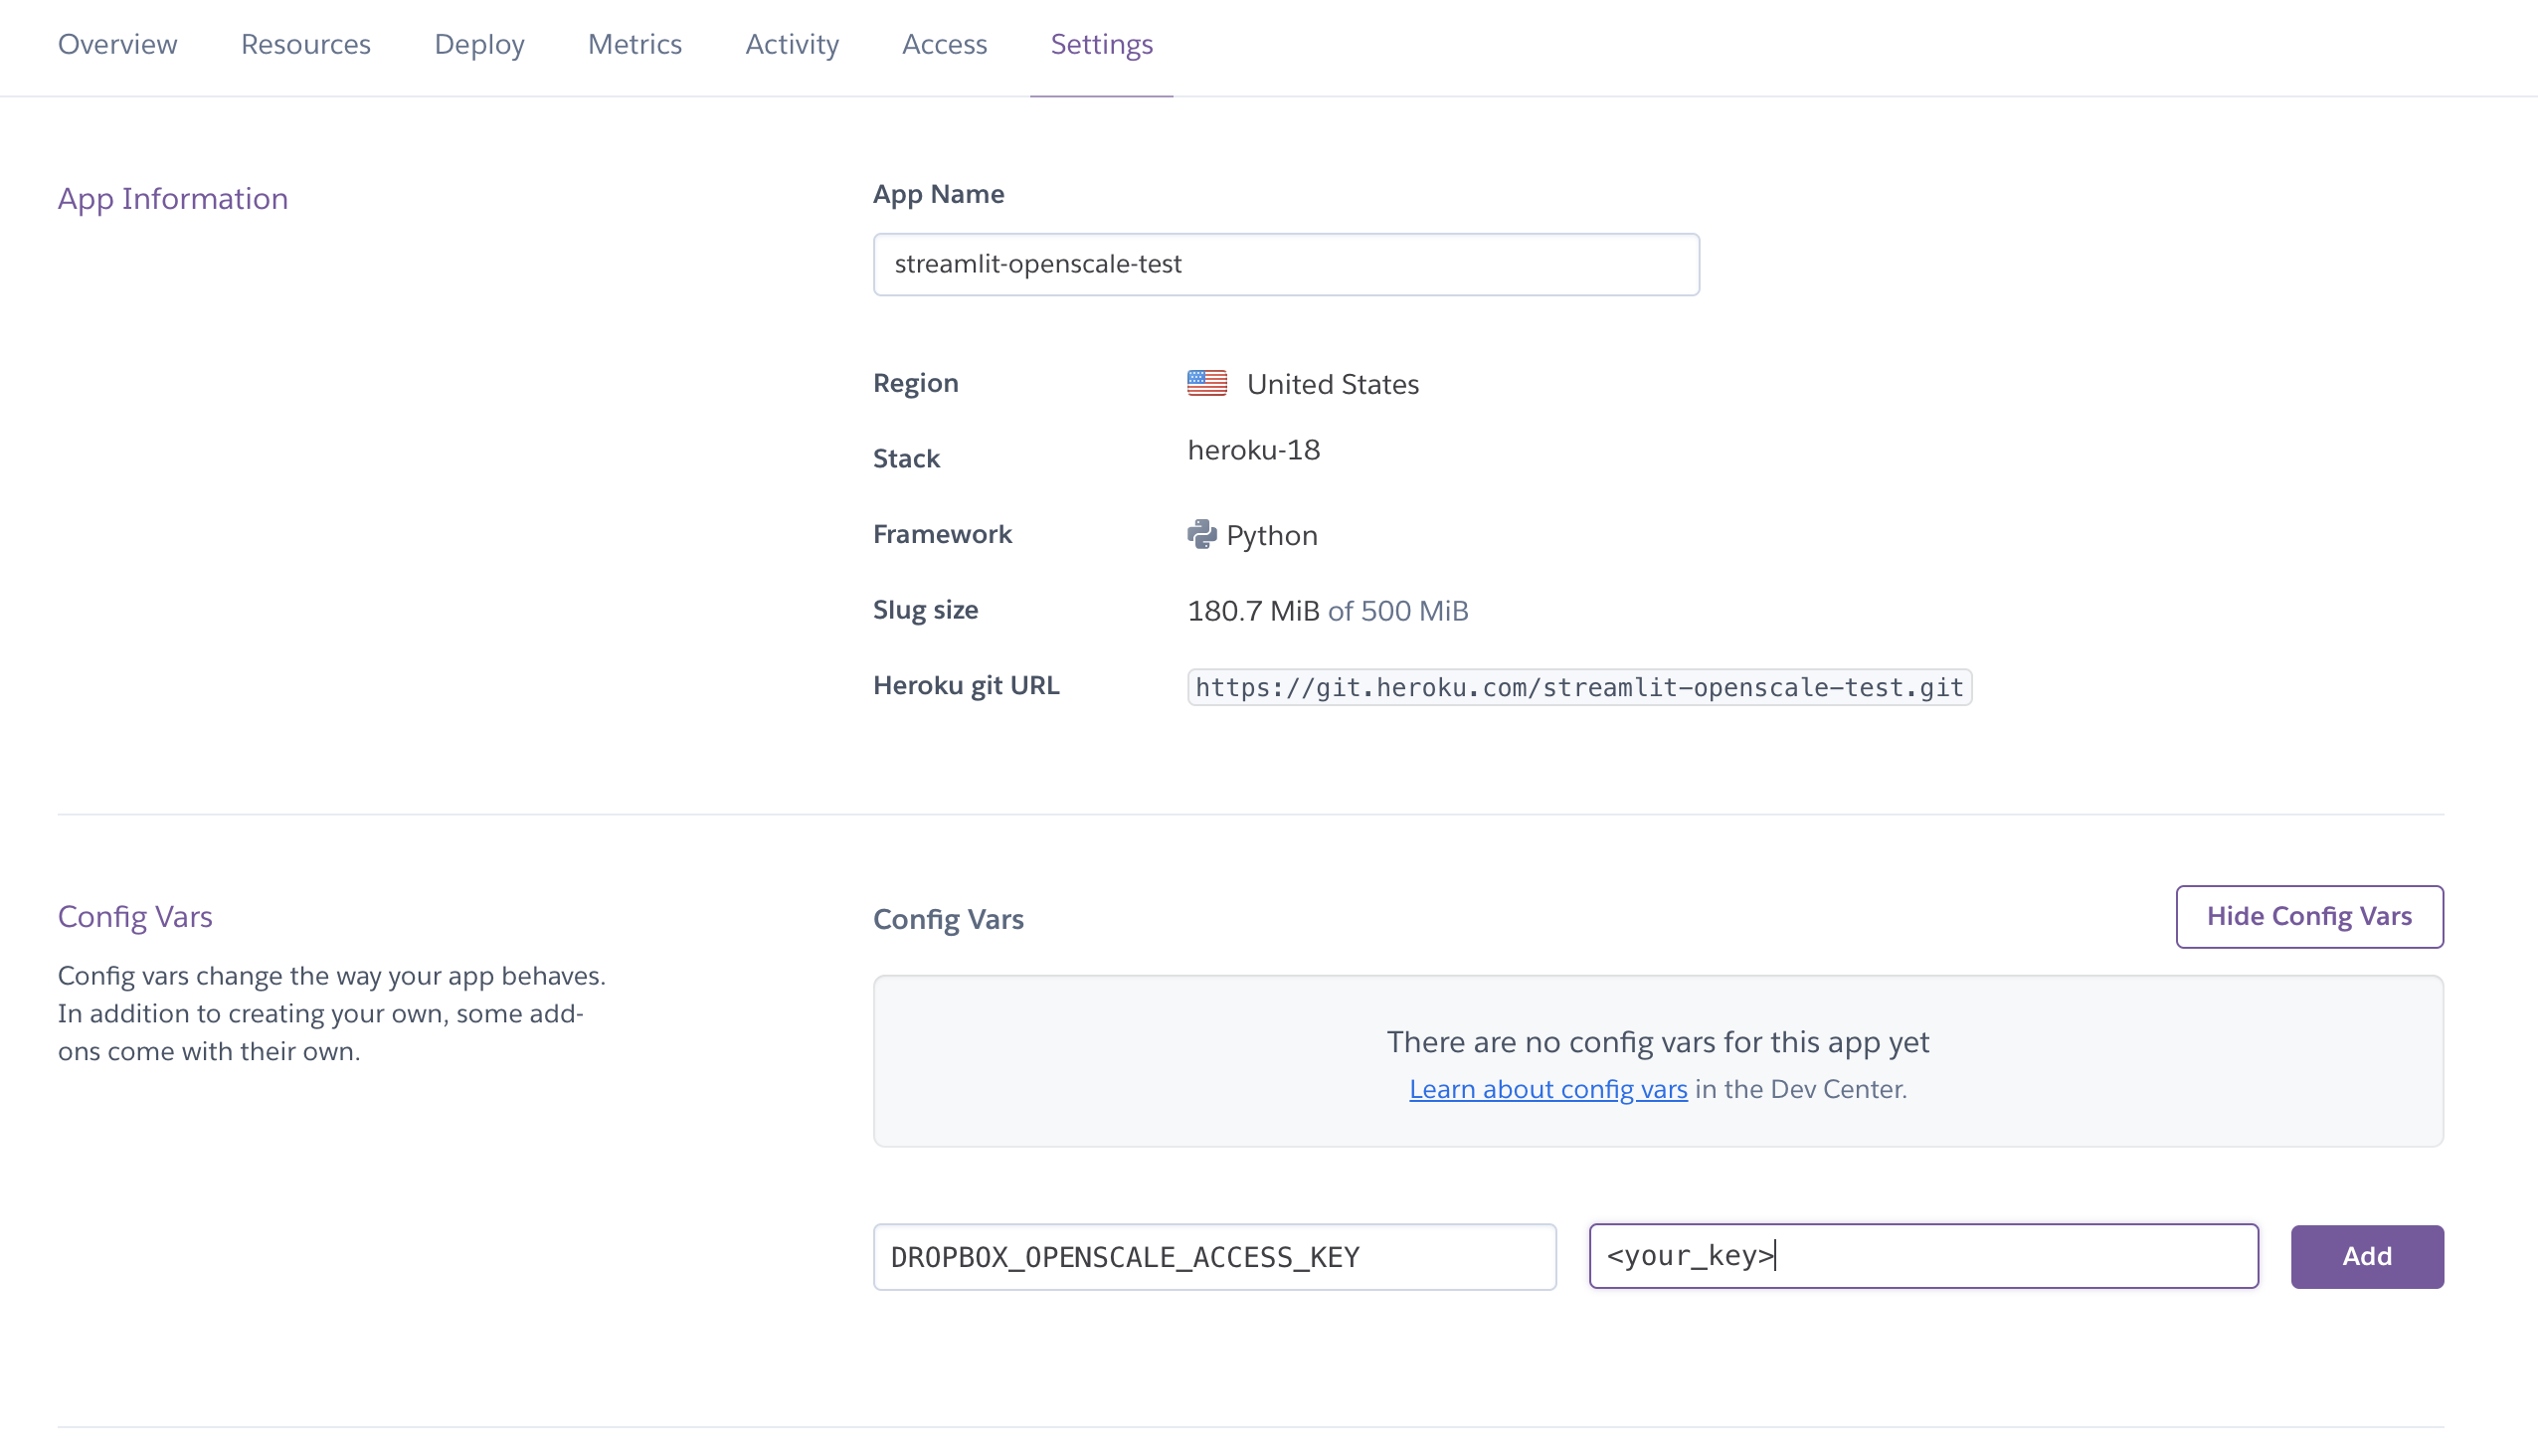
Step 5: Add the Heroku env vars
You can add the configuration variables, in this case DROPBOX_OPENSCALE_ACCESS_KEY in the heroku configuration page
Step 6: Deploy!
Once the configuration has been added, we can deploy it to heroku using the heroku command line.
git add . && git commit -am "heroku push" && git push heroku master
Check it out!
You can checkout a live version of the app here. Note that I’m running it on free dynos, it might take a little bit of time to load.